The 3D office and the Dashboard
Your team works in two views of the same system: the 3D office, to ask for work and watch the agents, and the Dashboard, to review numbers and tables. Here you learn to move around both and make the office your own.
On this page
- Move the camera
- Understand what the employees are doing
- Talk to an employee
- Follow activity and approvals
- Adjust the light
- Redecorate the office
- Switch to the Dashboard
- Read the top bar
Move the camera#
The office is a 3D scene and you choose the point of view. While no employee is selected, the bottom right corner reminds you of the mouse gestures.
| Action | With a mouse | With a phone held upright |
|---|---|---|
| Rotate the view | Drag with the left button | Twist two fingers on the screen |
| Zoom in or out | Use the scroll wheel | Pinch with two fingers |
| Pan the view | Hold the right button and drag | Drag with one finger |
Tip
Get close to a desk to see better what each agent is doing.
Understand what the employees are doing#
Each person is an agent, and what they do in the scene reflects their real work: typing at their desk, meeting others to plan, or waiting in the approvals area when they need your permission.
Their status, for example Working, Reviewing, Blocked or Awaiting approval, also shows on the Team cards of the Dashboard.
Talk to an employee#
To talk to one specific agent instead of the whole office, use their panel.
- Click the employee in the scene.
- Write to them in the “Chat” tab of the panel that opens on the right.
- Go through the other tabs to see their “Status”, “Tasks”, “Reports”, “Files” or “Profile”.
- Close the panel to see the whole office again.
Tip
In “Tasks”, a finished task offers “Save as skill” so you can reuse that method.
Follow activity and approvals#
At the top left is the “Live activity” box, with what each agent does step by step. You can minimize it with its arrow and open it again whenever you want.
At the bottom left, the approvals tray appears when something is pending. It opens by itself when a new one arrives, you can hide or show it, and in the scene the agent waits in the approvals area with its card to “Approve” or “Reject”.
Tip
On small screens the activity box does not appear; use the Dashboard to follow it.
Adjust the light#
The “Light” button at the top right changes the lighting of the whole office. Changes are saved right away.
- Press “Light”.
- Pick a mood: “Natural”, “Warm”, “Cool”, “Sunset” or “Night”.
- Adjust the “Temperature” slider, from warm to cool, and the “Brightness” slider, from dim to bright.
- Close the panel with the X.
Tip
The light is visual only: it changes nothing about the agents' work.
Redecorate the office#
With “Edit office”, next to “Light”, you place the furniture you bought in the Shop and change the ambience. You need a role that can spend coins (Member or above).
- Press “Edit office”.
- In “Furniture”, pick a piece from “Your furniture” and click in the office to place it. The R key rotates it and Esc cancels.
- Drag anything already placed to move it; Del removes it.
- In “Workstations”, choose the style of the desks and chairs.
- In “Ambience”, change walls, floor, lighting and the view from the window.
- Press “Save” to keep your changes or “Discard” to leave without saving them.
Tip
If someone else changed the office while you were editing, press “Reload” to see their changes.
Switch to the Dashboard#
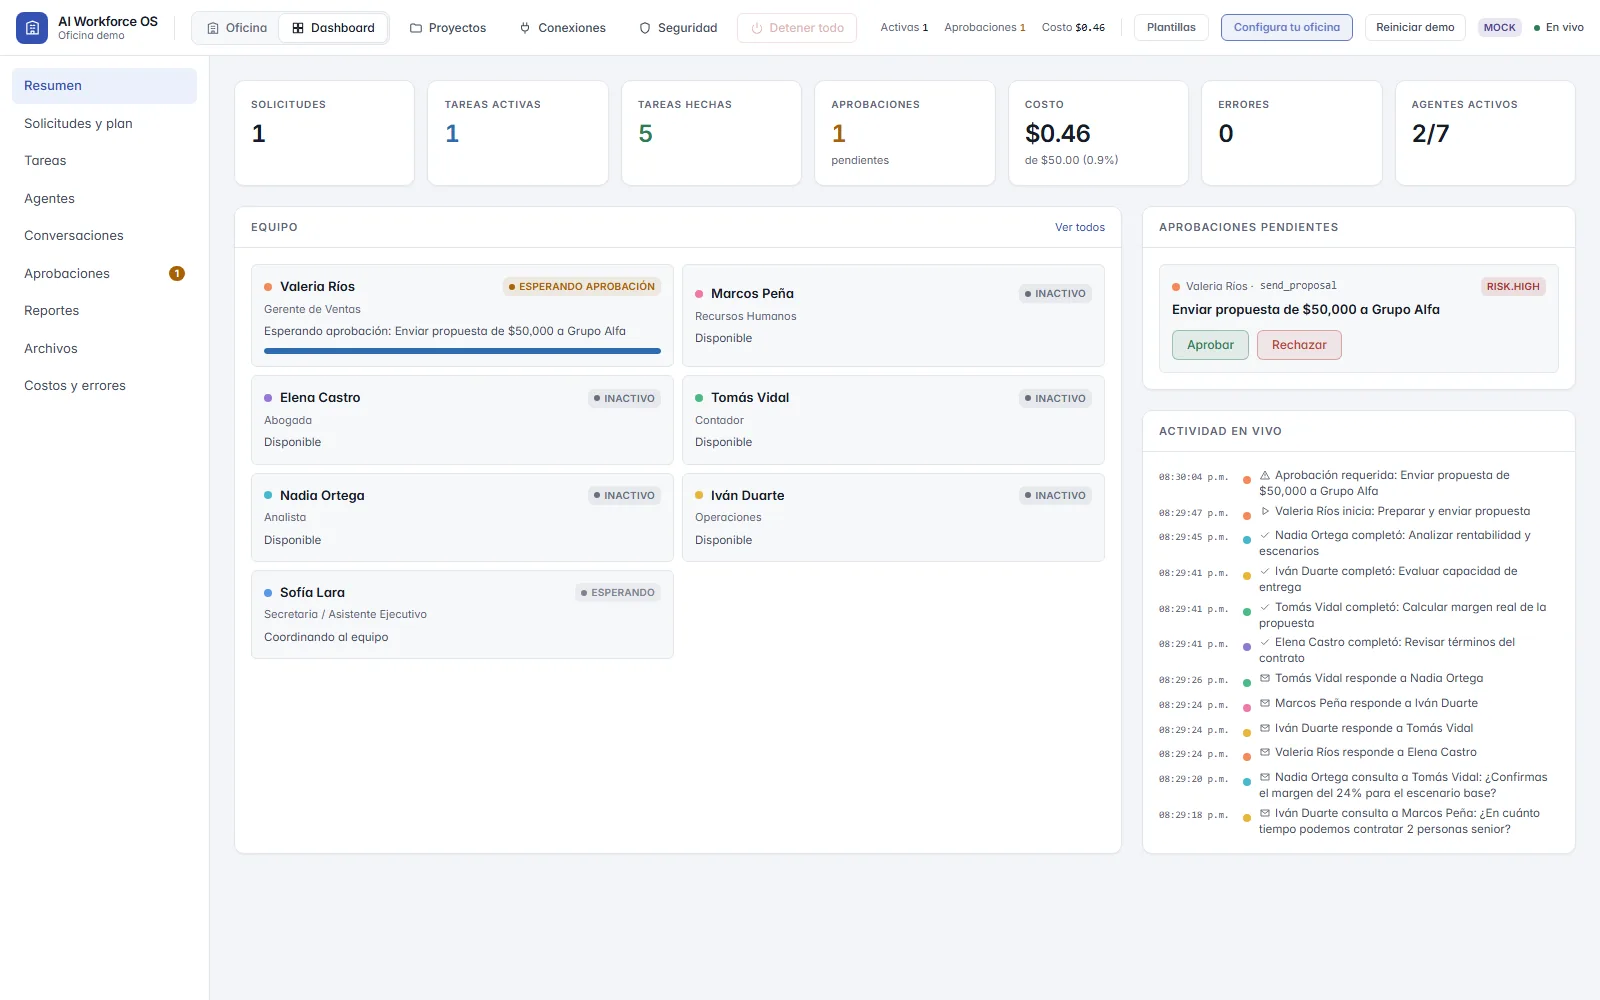
The Office / Dashboard switch in the top bar changes the view. The Dashboard shows the same operation as numbers and tables, with these sections on the left:
- Press “Dashboard” in the top bar.
- Start with “Overview”: Requests, Active tasks, Tasks done, Approvals, Cost (with its share of the budget), Errors and Active agents.
- Open the section you need.
- Press “Office” to ask for work again and watch the agents.
| Section | What you find |
|---|---|
| Overview | Indicators, the Team with each agent's status, pending approvals and live activity |
| Requests & plan | Each request with its task plan and status |
| Tasks | Every task and its status |
| Agents | One card per agent with its done and pending tasks and its autonomy |
| Conversations | The team's conversations |
| Approvals | Pending decisions, to approve or reject |
| Reports | The reports of completed requests |
| Files | The office files |
| Quality | An advisory score per employee, which never changes its autonomy or permissions |
| Costs & errors | Cost per agent and per request, “Budget limits”, and errors and blocks |
Tip
If Approvals, Cost or Errors change color, they are worth a look.
Read the top bar#
The top bar stays with you on every screen. Depending on your screen width, it shows:
- Approvals: how many are pending; the number changes color when there are any.
- Cost: what has been spent so far.
- The daily goal, for example “Finish 1 task today”, with its progress and its coin reward.
- “Getting started”, while you have steps left in the starter list.
- The “?” button, which opens a guided tour of the current screen.
- Coins: your balance; press it to open the Shop.
- Live or Reconnecting…: the connection status.
Note
If the AI runs in simulation mode, there is no real model behind it and the cost you see is not real spending with a provider.
Try it in your own office
Create your account and land in an office with your AI team. For now the AI runs in simulation mode: scripted responses, no cost and nothing to connect.