Projects: big work, tracked
A request in the office bar is enough for a single task. When the work has many parts, use a project: it brings together objectives, tasks split among your employees, approvals and budget. Here you learn to create it, launch it and follow it to the end.
On this page
- Decide whether you need a project
- Create a project
- Review the plan and launch it
- Provide the data the project needs
- Follow progress and control the project
- Use the project tabs
- Start from a template or save your own
- Collect the bonus when it finishes
Decide whether you need a project#
A project is a plan with several objectives. Each objective splits into tasks done by an agent, and some are human steps, such as an approval or a milestone only you can sign off. It suits you when:
- The work has many parts or several phases.
- Several agents need to move forward in parallel.
- You want to set a budget before starting.
- You will repeat the same work and a template helps.
Tip
For something small, ask for it directly in the office bar.
Create a project#
- Open “Projects” in the side menu and press “New project”.
- Write the “Project goal” in your own words, or pick a template in “Template”. With “No template (free plan)”, the plan is built from your goal.
- If you picked a template, fill in its parameters and check the “Plan preview”: tasks, human gates, longest chain, parallel work and estimated cost.
- Enter a “Budget (USD, optional)” or leave it empty to have one suggested from the estimate.
- Press “Create draft”.
Tip
Creating the draft spends no budget: the project has not started yet.
Review the plan and launch it#
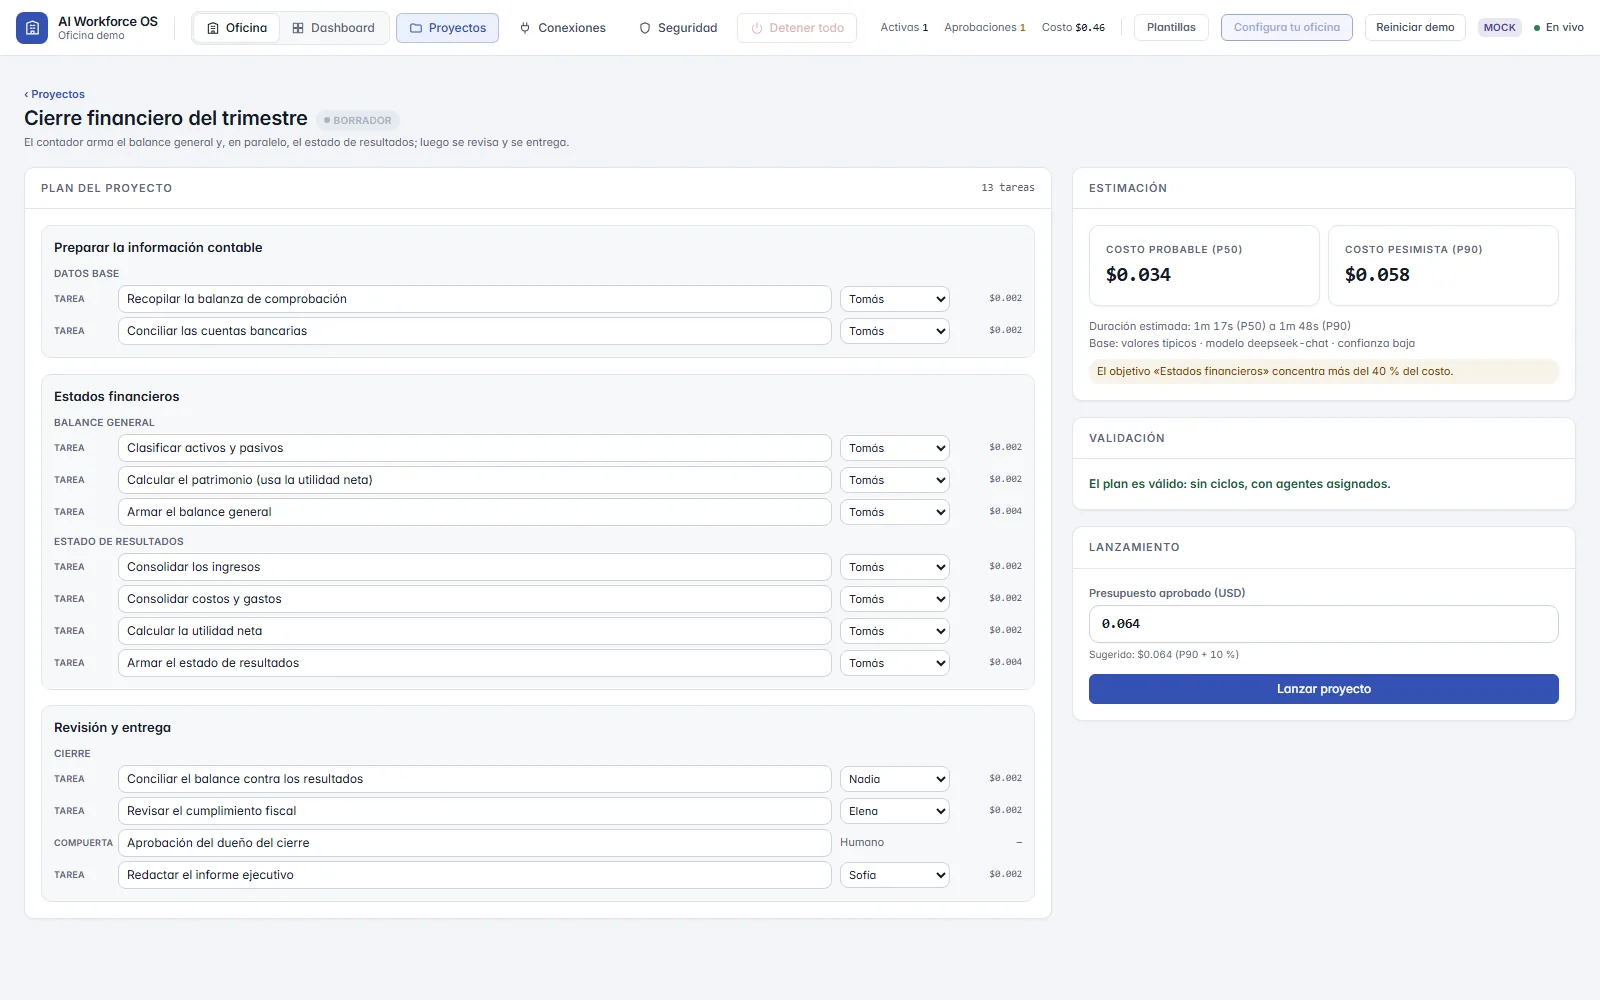
The draft shows the “Project plan”: each objective with its tasks and the assigned agent. Until you launch it, you can adjust it.
- Change a task's title or the agent doing it, and add acceptance criteria, one per line.
- Check the “Estimate”: “Likely cost (P50)”, “Pessimistic cost (P90)” and the estimated duration.
- In “Quality review”, choose “Do not review”, “Only when the agent is unsure” or “Always”.
- Make sure “Validation” says the plan is valid.
- Enter the “Approved budget (USD)”. The app suggests P90 plus 10%.
- Press “Launch project”.
Note
Only tasks with acceptance criteria are reviewed, and each review counts toward the budget.
Warning
If the budget is below the likely cost, the project may pause for lack of funds; to launch anyway you must tick “I understand the risk and want to launch anyway”.
Provide the data the project needs#
Some projects need data to compute real figures. In that case the draft shows the “Before you start” card, and what you provide is stored in the project's Inputs folder, where all its agents read it.
- Press “Upload file” to upload the data from your computer.
- Or press “Pick from the drive” to use files already in Files.
- If you only want to try it, press “Use sample data”: fictional data that fills in what is missing.
- If you do not have the data, press “Launch without this data”: it is recorded and the agents will work with explicit assumptions.
Follow progress and control the project#
Each card in the Projects list shows the status, a bar with finished steps over the total, tasks “to approve”, those with problems and spending against the budget. Inside the project you see the same bar at the top.
Depending on its status, the project offers “Pause”, “Resume” or “Cancel”. Cancel asks for confirmation and stops any unfinished tasks.
Use the project tabs#
The tabs follow a working order: Health tells you if there is a problem, Map shows where, Kanban and lanes are for acting, and Timeline is for replanning.
| Tab | What it is for |
|---|---|
| Health | Knowing whether something is wrong |
| Map | Seeing where in the plan the problem is |
| Timeline | Replanning dates and dependencies |
| Kanban | Acting on tasks by status |
| Agent lanes | Acting on each agent's tasks |
| Delegation | Seeing who asked whom for work |
| Approvals | Deciding what you must authorize and revoking remembered decisions |
| Plan changes | Reviewing proposed changes to the plan |
| Costs | Seeing what has been spent |
Start from a template or save your own#
- In “Projects”, press “Use template” on one of the listed templates, or “See all” to open the library.
- In the library, search by name or description and press “Use”, “Duplicate” to adapt it, or “New template” to build one from scratch.
- To repeat a project you already ran, open it and press “Save as template”.
Note
Saving as a template keeps the project's structure; results and costs are not copied.
Collect the bonus when it finishes#
When a project finishes successfully with at least two tasks done, your organization receives a one-time coin bonus. With the default settings it is 20 coins plus 2 per finished task, capped at 100. A cancelled or failed project does not receive it.
Coins are only earned by finished work, cannot be bought with money and are spent on cosmetic items in the Shop.
Try it in your own office
Create your account and land in an office with your AI team. For now the AI runs in simulation mode: scripted responses, no cost and nothing to connect.